

How to Replace a Bench Grinder Capacitor (Helpful Guide)
You can save money by doing your power tool repairs yourself. Bench grinders may be intimidating for some people, but repairing them is not that difficult. Once you know how to do it, you can replace broken parts with ease.
How to Replace a Bench Grinder Capacitor: To replace a bench grinder capacitor, all you need to do is remove the two wires on one end of the old capacitor and then reattaching them to the new one. That’s it.
While replacing the old non-working capacitor is easy, making sure you have the right one for the job may not be. Placing the wrong capacitor inside your bench grinder could burn out the new one as well as your bench grinder motor.
Just continue to read our article to get the information you need to know about replacing your bench grinder capacitor.
Replacing a Bench Grinder Capacitor 101
Start Capacitor for Bench Grinder
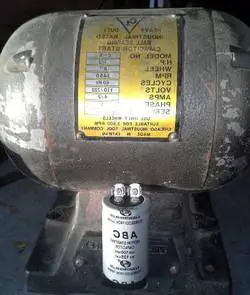
One of the things to remember in replacing a start capacitor is that you can use one with a higher voltage rating. If our bench grinder’s owner manual calls for 125V start capacitor, it is still okay to use a 250V model.
The reasoning behind this move is the phase shift caused by the inductive motor winding needs more voltage space. Also, because of the odd spikes in the electrical grid, having a little extra space in the voltage rating is seen as a protective measure.
The only thing to watch out for is that the capacitor with a 250V rating may be larger than the original capacitor in your bench grinder. It will be hard to make it fit.
Bench Grinder Capacitor Test
One way to test whether the capacitor is good or not is to use the pull string method. How you do this is not that difficult. The key is to make sure you wrap the string around the shaft in the correct direction.
The correct direction is where when you pull the string the bench grinder wheel is spinning in its proper direction. After you have wrapped the string around the shaft, give it a hard pull. Then turn on the power.
If the motor keeps on spinning, then your capacitor is bad and needs replacing.
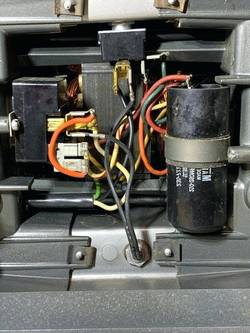
Bench Grinder Capacitor Wiring
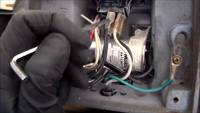
Normally bench grinder capacitor wiring is pretty straight forward. You have one red wire and one black wire that attaches to the capacitor. All you have to do in this situation is remember where the red wire and the black wire went and hook the capacitor up the same way.
Yet, there are those situations where the manufacturer may throw you a curveball. In these cases, the two wires are the same color and you will have a very difficult time hooking the wires to their correct spots inside the bench grinder. You may need expert help to figure it out.
What Size Capacitor for Bench Grinder
One of the vital differences when it comes to sizing a capacitor is the voltage rating. Most parts for a bench grinder are rated in DC voltage capacities. Except for the run/start capacitor.
The voltage rating for one of these parts is in AC and looks like this— 250VAC The other important piece of information you need to know is that there is no upward limit on the voltage rating.
The only problem you will have is getting the higher-rated capacitor to physically fit in the space vacated by the older model.
Craftsman Bench Grinder Capacitor
You may find a difference between your old Craftsman capacitor and the new one. The old model should only have two terminals, while the new one will show that it has 4.
This does not change the wiring at all and the two lugs on the left, and the two on the right side work together as one unit. You would need to use a multimeter to make sure that is the case.
If they do not work together, then you should use fully insulated spade connectors to protect your connection.
Delta Bench Grinder Capacitor
One of the problems with replacing an old Delta capacitor is that the old parts may be discontinued. As is the case for capacitor #1343835. When this happens, you will need to go to a repair shop to see if they have the correct capacitor on hand or a viable alternative you can use.
There are capacitors available through the Delta website but there may not be a picture available and the capacitor may have the same colored wires on it.
Ryobi Bench Grinder Capacitor
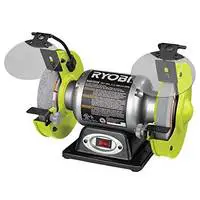
Even with older Ryobi bench grinders, you are going to have a little difficulty finding a replacement capacitor. Its model number 603201 is also discontinued. Looking in repair shops dedicated to fixing power tools may solve this problem for you.
Although finding a generic capacitor may not be that successful. Some name brand power tool makers restrict which capacitor will fit into their bench grinders.
Answering Your Questions
1. If the capacitor is missing, how do I find a replacement?
You would need to know the specs of the bench grinder motor including the ROM and HP. Then check this catalogue or this one.
2. What are the differences between capacitors?
The difference is in their purpose. The start capacitor is designed to help get the bench grinder running and usually is cut out once the motor reaches 75% of operating speed. A run capacitor continues to run after the startup is over and helps the bench grinder continue to run until it is turned off.
Some Final Comments
Replacing a capacitor on a bench grinder is not that difficult. You just have to know which one is the bad one and get the right replacement part. Finding that replacement part may be a bit challenging as manufacturers make changes to their products all the time.
Or they discontinue a part for whatever reason they may have. When this situation occurs, you may be faced with the task of running around to different repair shops until you find the model that will fit your bench grinder.
Failing that, you may have to face the decision to replace your bench grinder with a newer model. This model should have replacement parts that are easier to get. Either way, you will have a bench grinder that is ready for grinding action.
